Your track lighting looked great when you installed it, but now those lights feel way too bright. Customers squint when they walk in, you get headaches by afternoon, and your electric bill keeps climbing because the lights run at full power all day. You might think you need to replace everything and spend thousands, but you don't. There's a simple way to add dimming to your existing track lights for around $300-500, and it takes less than two hours to set up.
What Happens in Different Types of Spaces
Fixed brightness creates real problems, and they look different depending on your business.
- Retail Stores: Too much brightness washes out your product colors and creates glare that makes customers squint. Whether it's 10 AM or 8 PM, your store looks exactly the same. The result? Customers don't stay as long, and shorter visits mean fewer sales.
- Restaurants and Cafes: Lunch needs bright, energetic lighting. Dinner needs something softer and more intimate. One brightness level means neither meal service feels right. You'll see it in your reviews when guests complain about lighting that's "too bright for a romantic dinner."
- Offices: Screen glare gets worse as the day goes on. By mid-afternoon, people are dealing with eye strain and headaches. Video calls look harsh and unflattering. Different tasks need different lighting, but you're stuck with just one option.
- Salons and Spas: Here's the problem. You need bright light for precision work like coloring and cutting. But your clients want to relax, not feel like they're in a hospital. One setting can't handle both jobs, so you end up compromising on either quality work or client comfort.
Why Track Lighting Feels Too Harsh
Many people think buying better fixtures will solve their brightness problem. It won't.
1. Quality fixtures help, but they're not the real solution.
Good anti-glare fixtures do reduce direct glare and make light less harsh on your eyes. That's great! But even the best fixtures feel too bright when they run at full power all day long. The problem isn't your fixtures. The problem is you have no way to turn them down.
2. Your eyes need different brightness at different times.
Think about how your eyes feel throughout the day. In the morning, you can handle bright light just fine. By afternoon, moderate lighting feels more comfortable. In the evening, you want something softer that creates the right mood.
Right now? Your lights stay the same from opening to closing, which means they're wrong most of the time.
Good fixtures make light more comfortable, but without dimming control, you're stuck with one setting trying to work for every hour of the day. That's why even expensive, high-quality track lights still feel harsh.

Quick Check: Will This Upgrade Help You?
Answer yes or no to these questions about your current lighting situation.
Common problems with fixed-brightness track lights:
- People complain your lights are too bright.
- You squint or get eye strain during the day.
- Customers or clients leave faster than you'd like.
- Different times of day need different moods in your space.
- Your space looks exactly the same all day long.
- You turn some lights off just to reduce overall brightness.
- Your electric bill seems high for the amount of lighting you have.
- You want modern smart features for your lights.
If you answered yes to two or more questions, adding dimming control will solve real problems you're dealing with right now. The more yes answers, the bigger the impact.
Most business owners say yes to at least three or four of these. The lighting problems you're experiencing are real, and they're costing you money every day.
Why Other Solutions Don't Work
1. Replacing Everything? Way Too Expensive
Sure, you could rip out all your track lights and buy new dimmable ones. But here's what that actually means.
You're looking at $5,000 to $15,000 for a typical commercial space. Installation takes 2 to 5 days, so you'll need to close your business and lose revenue. Leasing your space? You probably can't make permanent changes anyway. Got multiple locations? Multiply all these costs and closures.
Why throw away perfectly good lights just to add a feature you could get for way less?
2. Wall Dimmer Switches? Still Expensive and Outdated
A traditional wall dimmer seems simpler, right? Not really.
Professional installation still costs $800 to $2,500 because electricians have to cut into your walls and rewire everything. It takes 1 to 2 days of work. What do you get? Basic dimming with zero smart features. No phone control, no presets, no automation. Plus, many LED track lights flicker or buzz with standard dimmers.
And you're stuck walking to the wall every time you want to adjust anything. Wall dimmers were great in the 1990s, but modern controllers give you way more without the rewiring hassle.
3. Changing Bulbs? Not Actually a Solution
Some people try swapping in lower wattage bulbs. Here's the problem.
Many modern track systems have integrated LEDs you can't even change. Even if you can swap bulbs, you're just trading one fixed brightness for another. You still can't adjust when you need more light for specific tasks. That's not a solution!
4. Doing Nothing? The Most Expensive Choice
Living with the problem feels free, but it's not.
You're wasting 30 to 40% on electricity every single month. Your uncomfortable lighting keeps pushing customers away. Competitors with better lighting are creating better experiences and winning your business.
Every month you wait is another month of wasted money and lost opportunity.
The Smart Solution: Add a Controller Module
What Is It?
A smart controller is basically a control box that sits between your electrical power and your track lighting system.
Here's how it works:
- The controller plugs in between your wall power and your track rail.
- It controls how much electricity flows to your lights, which controls brightness.
- All your existing lights become dimmable instantly without replacing a single fixture.
- You keep using the same lights you already have—nothing gets thrown away.
Wall Power → [Smart Controller] → Your Track Rail → Your Existing Lights
What makes this different from other options:
- You don't replace your fixtures, which saves thousands of dollars.
- You don't rewire walls or cut into drywall, which saves time and mess.
- It works with the track lights you already own and installed.
- You get phone app control, voice commands, and automation features.
- The entire installation takes less than 2 hours from start to finish.
Think of it as adding smart features to your existing system instead of ripping everything out and starting over. Your lights stay the same, but now you can control them however you want.
What You'll Need Before You Begin
Gather everything you need before starting the installation to make the process smooth and safe.
Tools and materials you'll need:
| ✓ | Tool/Material | What You Need |
|---|---|---|
| ☐ | Smart Controller | Correctly sized for your total wattage |
| ☐ | Screwdriver | Standard (check specific type in instructions) |
| ☐ | Voltage Tester | Essential for safety - confirms power is off |
| ☐ | Ladder/Step Stool | For comfortable ceiling access |
| ☐ | Smartphone | App download and device pairing |
| ☐ | Time Block | 1-2 hours during closure |
Safety requirements (extremely important):
- Turn off power at the breaker box before touching any wires.
- Use a voltage tester to confirm the power is actually off—don't skip this step.
- If you feel unsure about electrical work, hire an electrician for $100 to $200.
- Check your local building codes, as some areas require licensed electricians for all electrical work.
Electrical work is safe when done properly, but it's dangerous if you're not careful. There's no shame in hiring a professional—they'll complete this job in 30 to 45 minutes and give you peace of mind.
How to Install Your Smart Controller: A Step-by-Step Guide
Step 1: Turn Off Power and Access the Connection
Start by making sure the power is completely off before you touch anything.
- Find the correct circuit breaker that controls your track lights.
- Flip the breaker to the OFF position.
- Try to turn your track lights on—they shouldn't work, which confirms you found the right breaker.
- Use your voltage tester on the wires to verify power is completely off.
- Remove the cover plate where power enters your track system, usually a junction box at the ceiling.
Common mistakes to avoid: Don't assume the breaker labels are correct—always test. Don't skip the voltage tester step. Make sure you're testing the actual track lights, not different lights on another circuit.
Step 2: Examine Your Wiring
Look at the wires connecting your ceiling power to your track system.
- Black wire carries the power (called "hot" in electrical terms).
- White wire completes the circuit (called "neutral").
- Green or bare copper wire is the ground for safety.
- These three wires connect from your ceiling electrical box to your track rail.
Take a photo before touching anything. This picture helps if you need to ask for help later, and it shows you exactly how everything should reconnect. Most wiring problems happen because people forget how things were originally connected.
Step 3: Install the Controller
Now you'll connect the controller between your ceiling power and your track.
- Ceiling wires → Controller INPUT
- Controller OUTPUT → Track wires
Installation process:
- Carefully disconnect the track wires from the ceiling wires.
- Connect the ceiling wires to the controller INPUT side following color coding (black to black, white to white, green to green).
- Connect the controller OUTPUT side to your track wires using the same color matching.
- Twist each wire connection tightly—loose connections cause problems.
- Cover each connection with wire nuts, which are usually included with your controller.
- Wrap electrical tape around each wire nut for extra security.
- Tuck all wires neatly into the junction box and mount the controller according to its instructions.
If this feels complicated or uncomfortable: It's completely fine to hire an electrician. They'll do this in 30 to 45 minutes for $100 to $200. It's worth paying for professional help if you're not confident with electrical work.
Step 4: Test the Installation
Time to see if everything works correctly.
- Walk back to your breaker box and turn the circuit breaker back ON.
- Your track lights should turn on at full brightness immediately.
- If lights don't turn on, turn the breaker back off and recheck all your wire connections.
- If lights flicker strangely, you might have too many lights for your controller's capacity.
Success looks like this: Lights turn on normally without any flickering, buzzing, or strange behavior. They should look exactly like they did before, just running through the new controller.
Step 5: Connect Your Phone and Remote
The final step is pairing your control devices.
For the remote control:
- Press the pairing button on your controller (check your manual for exact location).
- Press the pairing button on your remote within a few seconds.
- The controller light will blink or change to confirm they're synced.
- Test dimming up and down to make sure it responds.
- Walk across the room to verify the remote works from a distance.
For the phone app:
- Download the controller's app from your app store (the exact app name is in your controller instructions).
- Turn on Bluetooth and WiFi on your phone.
- Open the app and follow the pairing instructions on screen.
- Your controller should appear in the app within a minute or two.
- Test dimming from the app to confirm everything connects properly.
- You're done and ready to use your new system.
How to Set Up Your Light Scenes
Light scenes are pre-programmed brightness settings you can activate with one tap—like preset buttons for your lighting. Instead of manually adjusting brightness throughout the day, you create the perfect lighting for different times and activities, then switch between them instantly.
| Business Type | Scene Name | Brightness | Best For |
|---|---|---|---|
| Retail Stores | Opening | 100% | Setup and stocking |
| Shopping Hours | 75% | Comfortable browsing | |
| Evening | 55% | Cozy atmosphere | |
| Closing | 40% | Energy-efficient cleanup | |
| Restaurants/Cafes | Morning Prep | 100% | Cleaning and prep work |
| Lunch Service | 85% | Energetic dining | |
| Dinner Service | 45% | Intimate ambiance | |
| Bar/Late Night | 25% | Social atmosphere | |
| Offices | Morning Focus | 100% | Peak productivity |
| Afternoon | 80% | All-day comfort | |
| Meetings | 90% | Professional video calls | |
| After Hours | 30% | Security lighting | |
| Salons/Spas | Work Lighting | 100% | Detailed services |
| Consultation | 75% | Client conversations | |
| Treatment | 40% | Relaxing atmosphere | |
| Reception | 60% | Welcoming entrance |
Automation Options:
- Schedule changes: Auto-dim to 45% at 5 PM daily
- Voice commands: "Alexa, set lights to dinner mode"
- Motion sensors: Auto-adjust when someone enters
- Location triggers: Turn on when you arrive
Most businesses begin with 3-4 basic scenes and add more over time. All brightness levels are adjustable—experiment freely to find what works best for your space.
FAQ About Adding Dimmers to Track Lighting
Q1: Can I really add dimming to my existing track lights?
Yes, absolutely. A smart controller installs between your power source and track system to control brightness. Your existing lights stay unchanged—they just receive adjustable power levels. This works with 95% of track systems installed after 1995. The controller doesn't modify your fixtures, it simply controls the electricity they receive.
Q2: Do I need an electrician or can I do it myself?
You can do it yourself if you're comfortable with basic electrical work, own your space, local codes allow it, and you have 1 to 2 hours. Hire an electrician if you're unsure, you're leasing, local codes require it, or you have a complex setup. Either way, installation takes 1 to 2 hours total.
Q3: Will this work with my LED track lights?
Yes, modern controllers work perfectly with LEDs. They're designed for LED compatibility and work with 95% of LED track lights made after 2010, providing smooth 0 to 100% dimming without flickering. Major brands like Juno, Halo, and WAC work great. Systems from before 2000 should be checked with the manufacturer first.
Q4: Can I control it with my phone?
Yes. Modern controllers include phone apps for iPhone and Android, wireless remotes, voice control through Alexa or Google, and scheduling automation. You can dim from your register, share control with staff, switch scenes instantly, and set automatic adjustments throughout the day.
Q5: Can I have different brightness in different areas?
Yes, using multiple controllers. Each controller manages one zone independently. Bright work areas, dim lounges, highlighted displays—each controlled separately. Small spaces need one controller, medium spaces need 2 to 3, and large spaces need multiple controllers.
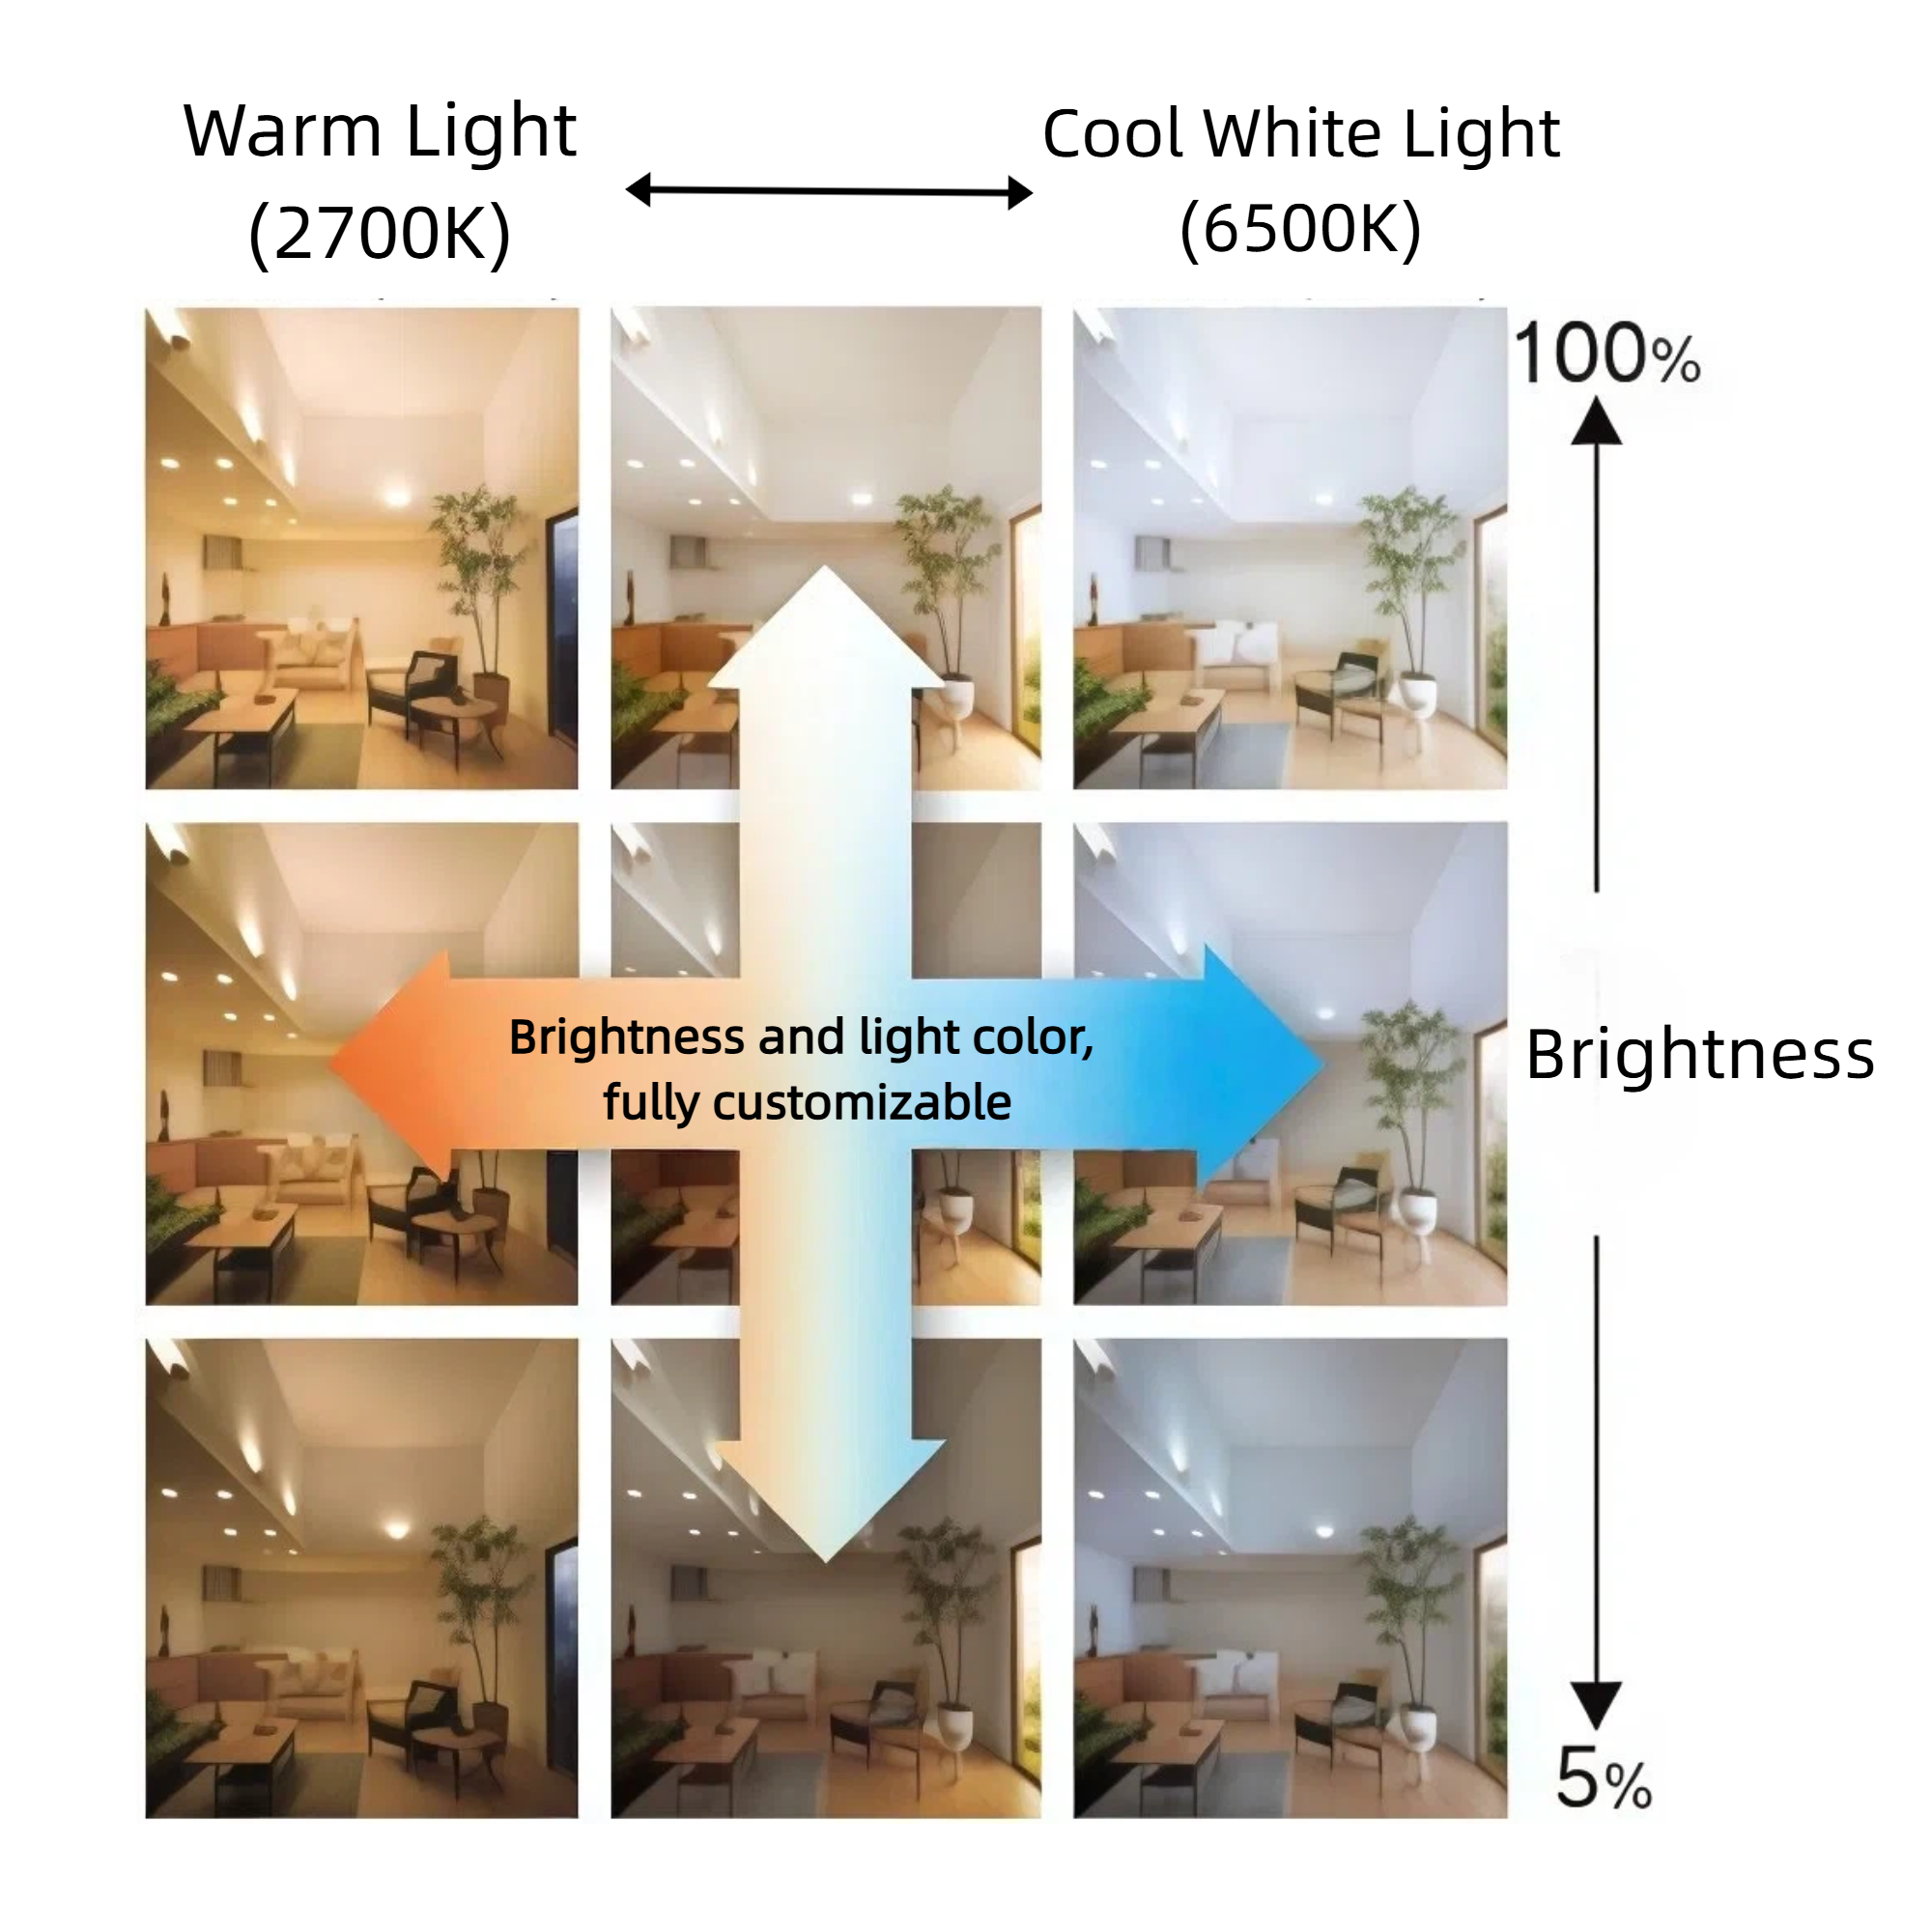
Q6: Does dimming affect light color?
No, not with quality LED-compatible controllers. Color temperature stays constant—3000K remains 3000K at all brightness levels. Colors stay accurate, which matters for retail products, salon color work, and restaurant food presentation. Cheap controllers sometimes shift colors. Stick with quality models.
Q7: Can I automate brightness throughout the day?
Yes. Set time-based schedules like "dim to 50% at 6 PM daily." Use sunrise/sunset triggers, motion sensors, voice commands, or location-based activation. Auto-brighten at opening, auto-dim before closing, use different weekend schedules, and create special event settings. Full automation is built into modern controllers.
Time to Stop Paying for Brightness You Don't Need
Stop living with track lights that are too bright. Add a smart controller, install it in two hours, and control your lighting however you want. You'll cut electric bills by 30%, adjust brightness throughout the day, and make your space more comfortable. Check if it works with your system and calculate your savings potential. Schedule installation for your next closed day and start benefiting immediately.